Cyberincidents (like cyber crime, IT failure/outage, and data breaches) are the number one threat of large and small companies. Now imagine your company is hit by a data breach. One moment you’re minding your business as usual, the next you notice unusually high outbound traffic, some changes in important files, suspicious user activity, or you’re straight-up locked out of your accounts. How do you react?
If simply thinking about this scenario triggered trepidation, you’re unprepared for such a situation. But don’t panic.
In this post, we’ll explain what incidents are, why it’s crucial to have an incident response playbook in place, how to create one and automate it with our workflow template.
Table of contents
- What is incident response?
- Why do you need an incident response playbook?
- What are the phases of an incident response plan?
- Why should you automate the incident response?
- Build an automated incident response workflow
What is incident response?
Let’s start with a definition of the key terms you’ll encounter in this article: incident, incident response, and incident response plan.
An incident is an event that threatens the operations, services, or functionality of an organization. For example, a server outage or cybersecurity attacks disrupt the everyday operations of an organization.
An incident response is the reaction to an incident. This reaction represents the way the organization manages the situation: from identifying the issue, over analyzing and fixing the problem, to preventing future re-occurrences.
An incident response plan (or playbook) is an organized, pre-established sequence of measures that the IT team takes when faced with an incident.
Why do you need an incident response playbook?
It is a truth universally acknowledged that people don’t make good decisions under stress. The stakes are even higher at large scale, when the data of millions of users or critical business operations are impacted.
And yet, more than 77% of organizations do not have an incident response plan. A Kaspersky report revealed that 51% of companies detected an incident after impact, and 74% needed weeks up to months for remediation.
An incident response playbook allows you to jump from (over-)thinking to acting in moments of crisis. The less decisions you need to make on the spot, the faster you can respond to the incident, minimize damage, and protect your company’s reputation.
What are the phases of an incident response plan?
An efficient incident response typically consists of six phases:
- Preparation: Get the IT team together, assign clear roles to each of them of what they should do in the case of an incident, and ensure that all necessary tools or services are available.
- Identification: This is the “Houston, we have a problem” moment. Once an incident is identified, establish what happened, where it originated, what parts of the business it affects and to what extent.
- Containment: Limit the incident threat from spreading to affect other processes, systems, or operations, and establish backups.
- Eradication: Make sure the issue is fixed and systems are patched, so thoroughly that no trace of the incident is left behind.
- Recovery: Once the incident is resolved, get all the services up and running again, restore connections and services to production.
- Learnings: Get the IT team together to discuss what they learned from managing the threat, what went well, and––most importantly perhaps––what could be improved. Add the incident and the taken measures to your internal documentation, so they can serve as reference for future issues.
These six phases should also be reflected in your incident response playbook.
Why should you automate the incident response?
Having an incident response playbook is a first step towards managing incidents more efficiently. However, it still involves manual actions (for example, notifying all team members in due time or creating tickets). The solution to this problem is automated incident response.
Though you can’t automate the whole process (someone has to roll up their sleeves and fix the actual issue), you can automate some low-level tasks that add up to cause delays and errors. Automation can assist, supplement, or completely replace human intervention. As a result, the IT team has less trivial tasks to worry about, and instead more time to deal with the critical ones.
By automating pretty much every step of the playbook, you achieve more efficient communication between team members and faster response times, which in turn improve the main incident response metrics: mean time to detect (MTTD),mean time to acknowledge (MTTA), and mean time to resolution / respond (MTTR).
Build an automated incident response workflow
Let’s put the theory into practice. In this part, we’ll build an automated workflow that follows the following incident response protocol:
- Triage issue in the project management platform
- Create a special channel in the team communication platform
- Add the on-call team members to the new channel
- Acknowledge the issue
- Fix the issue
- Resolve the issue ticket
In our workflow, we’ll use the following services:
- Jira for project management and issue tickets. (Alternatively, you can use Trello)
- Mattermost for team communication. (Alternatively, you can use Slack)
- PagerDuty for managing incidents.
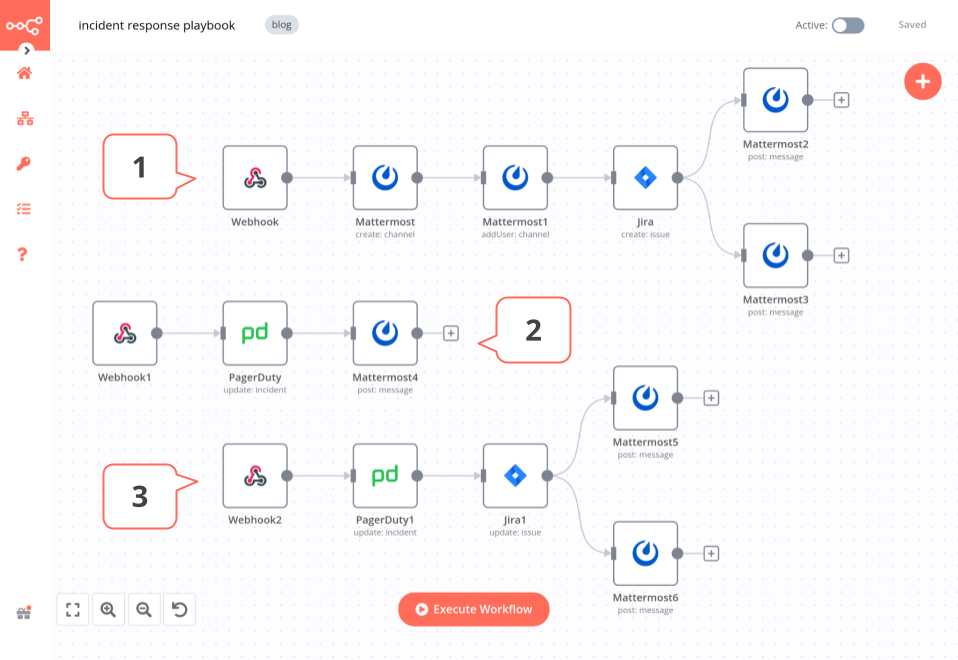
This workflow consists of three parts, each tackling different playbook steps:
- Workflow 1 covers triaging the issue, creating a special communication channel, and tagging the on-call team (steps 1-3).
- Workflow 2 covers acknowledging the issue (step 4).
- workflow 3 covers fixing the issue and resolving the ticket automatically (steps 5-6).
All put together, the final workflow look like this:
Workflow prerequisites
To follow along this tutorial and implement the workflow yourself, you’ll need the following:
- n8n: You can download the desktop app, sign up for n8n.cloud, or install n8n self-hosted. In this tutorial, we use n8n version 0.158.0.
- PagerDuty credentials: You’ll need these for configuring the PagerDuty node to manage incidents.
- Jira credentials: You’ll need these for configuring the Jira node to create tickets.
- Mattermost credentials: You’ll need these for configuring the Mattermost node to send notifications.
Workflow 1 - Inform the team about the incident
The first workflow automates the ChatOps practice when a new incident is detected.

- Webhook node triggers the workflow when an incident is created in PagerDuty.
- Mattermost node creates a new channel for the specific incident.
- Mattermost1 node adds responsible users to the channel.
- Jira node creates an issue about the incident in Jira.
- Mattermost2 node posts a message in the channel with links to the PagerDuty incident and Jira issue.
- Mattermost3 node posts a message in the channel with the options (buttons)
AcknowledgeandResolve.
Workflow 2 - Ensure that the incident is acknowledged internally
The second workflow automates the acknowledgement of the incident by the on-call team member.

- Webhook1 node triggers the workflow when the button
Acknowledgeis clicked in the Mattermost channel. - PagerDuty node updates the incident status as “Acknowledged”.
- Mattermost4 node posts a message in the channel that the incident has been acknowledged.
Workflow 3 - Mark the incident as resolved
The third workflow automates the resolution of the issue.

- Webhook2 node triggers the workflow when the button
Resolveis clicked in the Mattermost channel. - PagerDuty1 node updates the incident status as “Resolved”.
- Jira1 node
- Mattermost5 node posts a message in the channel that the issue has been closed in PagerDuty and Jira.
- Mattermost6 node posts a message in the channel that the incident has been resolved.
Activate the workflows in production
We’re done with building the workflows! Here’s how to see them all in action, from start to end:
- In the n8n Editor UI, click the
Execute Workflowbutton. - Go to your PagerDuty account and create a test incident.
- Back in the n8n Editor UI, you’ll see information being passed through the Webhook nodes, and the nodes of the workflows being executed.
With this configuration, the workflows work only when you manually execute them. To make the workflows run automatically, every time an incident is created in PagerDuty, you need to use the Production webhook and activate the workflows. Here’s how to do this:
- Get the Production webhook URL from the different Webhook nodes,
- Update the URLs on PagerDuty and the Mattermost node from Workflow 1, Step 6,
- Save the workflows
- Activate the workflows.
That’s it: you now have three no-code workflows that automate every step of an incident response, so the on-call team can focus on solving the problem.
This post was originally published on the n8n blog.